Intro to Threat Hunting - Part 2
Join me as I take you on a tour of a powerful threat hunting tool from Active Countermeasures called AC Hunter
Travis Conner
12/14/20237 min read
AC Hunter is a threat hunting analysis tool that helps determine the likelihood that a connection in our environment may be malicious. It also leverages web-based services like VirusTotal and AlienVault to assist us when we're investigating IP addresses and domain names interacting with our environment. Let's jump right in and take you to the dashboard...
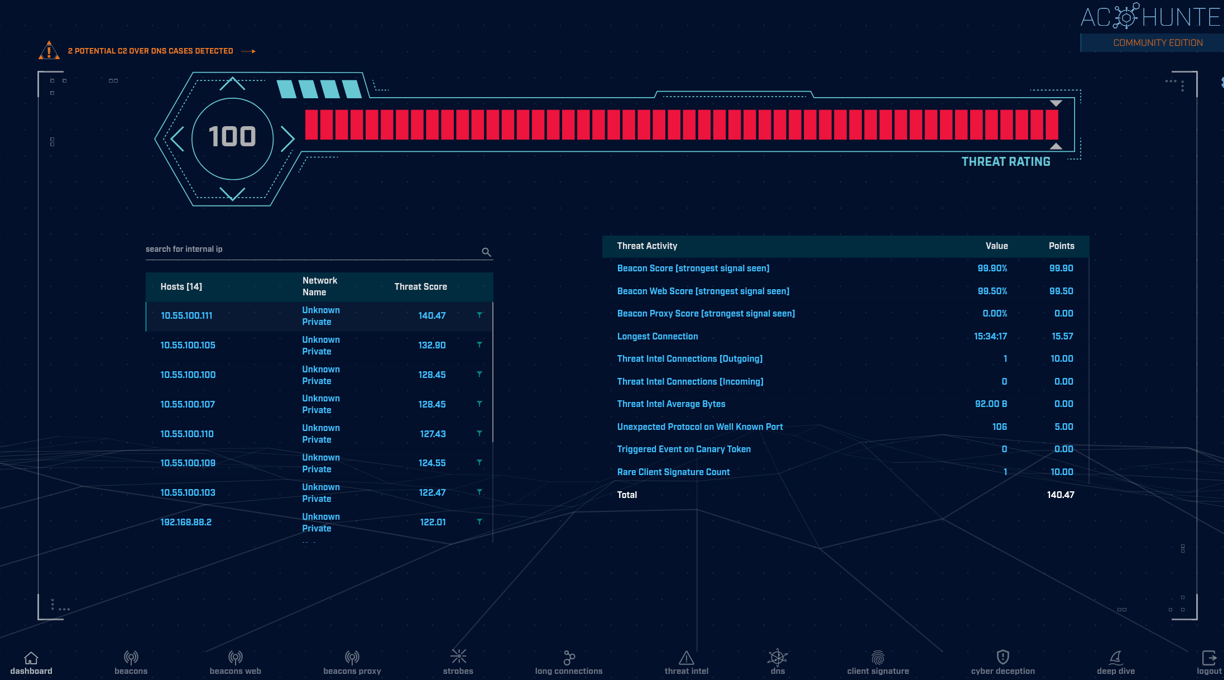
The internal IP addresses that you see on the left are the hosts in our environment. You'll see a "Threat Score" two columns over that is sorted from highest to lowest; the higher the score, the greater the chance that something malicious is taking place on that host. On the right side of the screen we have our "Threat Activity" pane that changes each time we click on a different host on the left side of the screen. The threat activity pane is where you see the breakdown of the score that was assigned to that particluar host you clicked on. Let's move on now to settings...
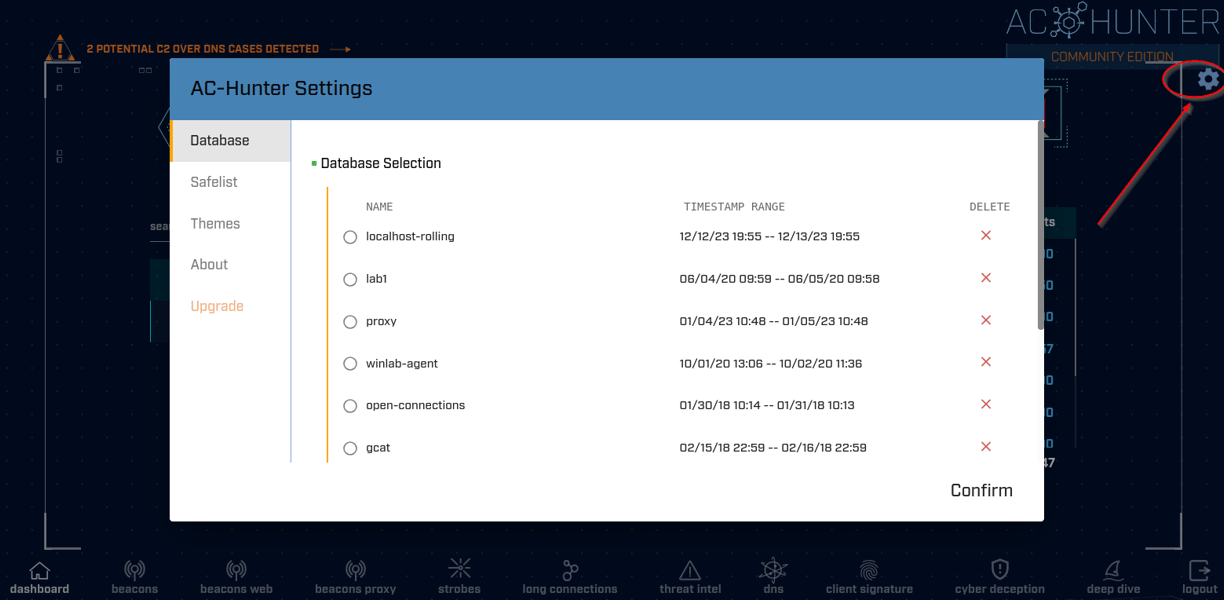
Once you click the gear in the upper right hand corner of the screen you'll see several items to choose from — Database, Safelist, Themes, About, and Upgrade. The 'Database' option is where we will choose which data set we want to work with. 'Safelist' is where we will add IP addresses or domains that we have concluded are not malicious. I'll demonstrate adding an item to the Safelist...
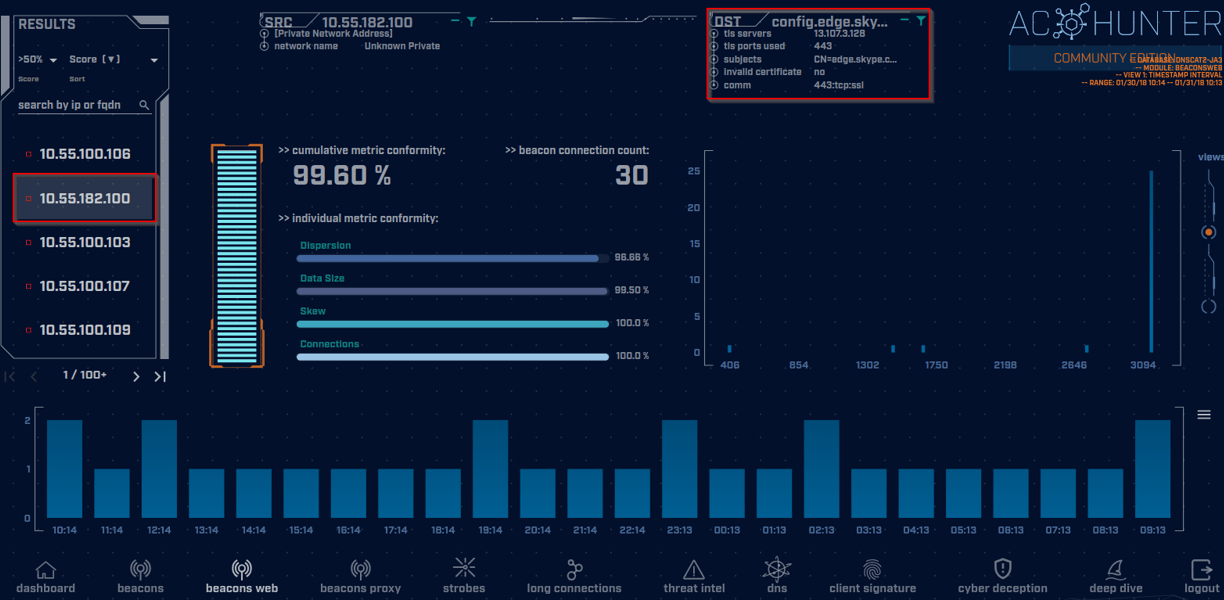
In this example, we see that our host at 10.55.182.100 is reaching out to the FQDN of config.edge.skype.com. We can see some information that the tool is giving us already about the destination such as having a valid certificate and utilizing the common HTTPS port of 443. We can get some further information about this FQDN by clicking on it and selecting VirusTotal out of the available options as an example...
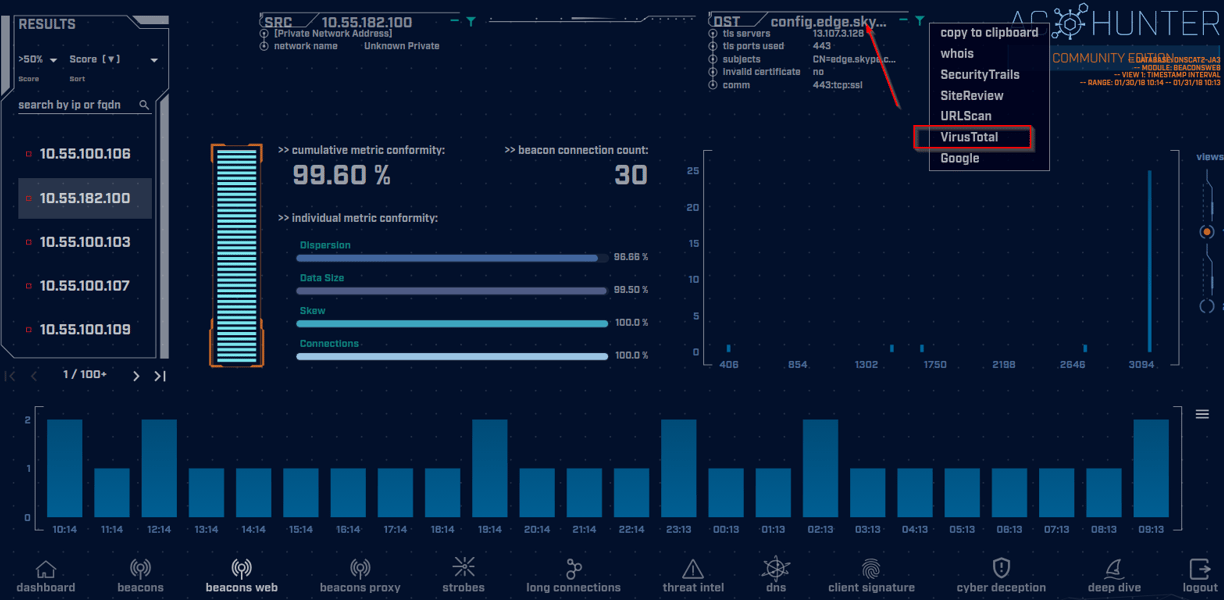
Let's see what VirusTotal has to say about the FQDN in question...
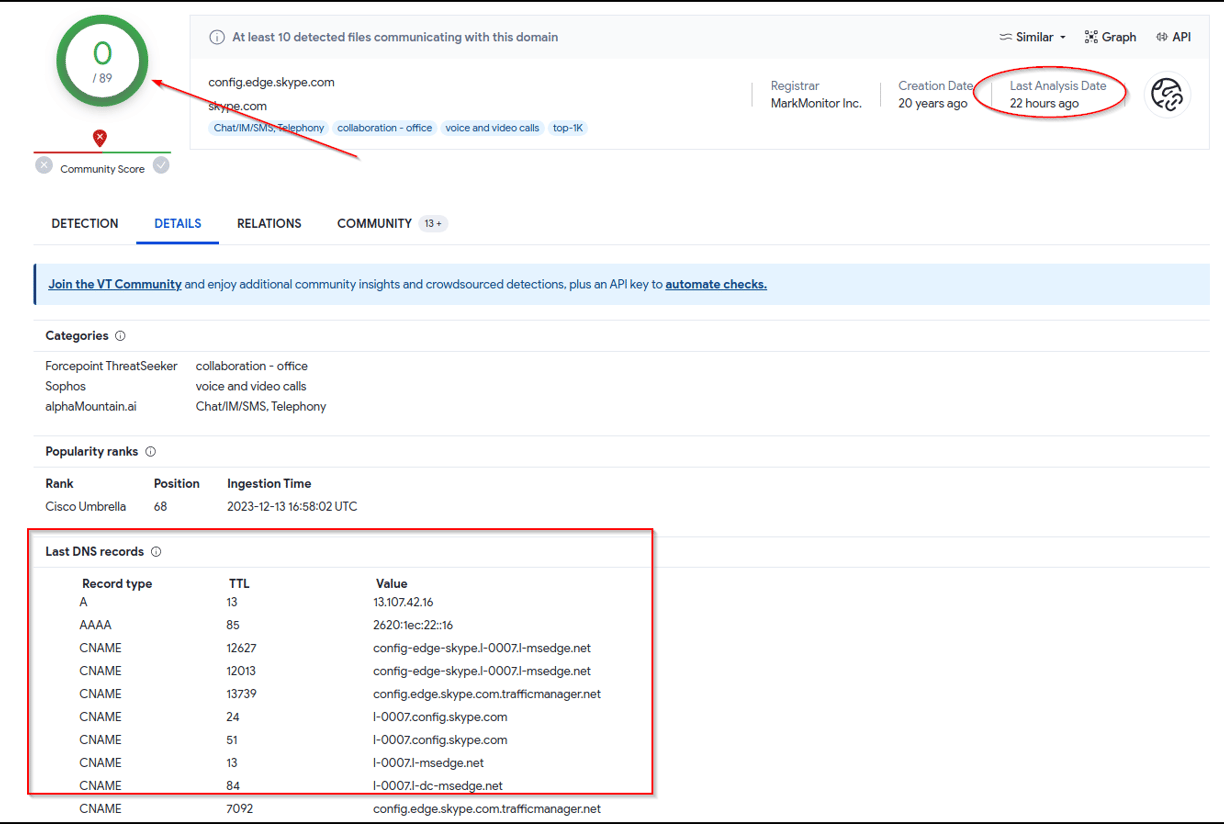
We won't do a deep dive into VirusTotal, but I do want to spend a few minutes talking about some things I highlighted above in red. In the top left corner you'll see a green circle and inside it shows "0/89." This means that out of the 89 sources that are being used to check whether this domain is malicious, no source has identified it as such. This is a good sign, and most likely means that the domain is benign. However, we can perform some additional checks to increase our confidence level. In the upper right corner of the screen you'll see when an analysis of this domain was last performed. In this case it was 22 hours ago, which is a good sign since that is a very recent analysis. If the last analysis took place 7 years ago, my confidence would not be so high, and I would run an updated analysis in VirusTotal. Finally, we see the DNS records showing a consistent pattern of this domain being associated with Microsoft and Skype which, again, is a good sign and increases my confidence that we are dealing with a known good application and connection. Now, let's take a look at adding this domain to the Safelist.
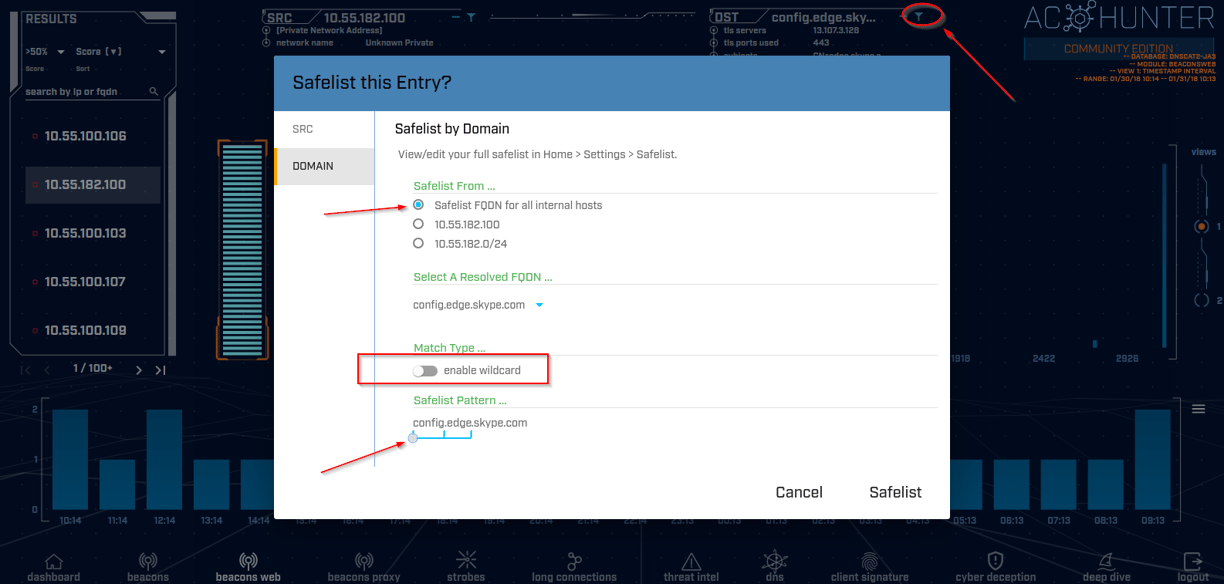
In the upper right corner of the image you'll see an oval around the filter icon. Clicking this brings up the safelist entry dialogue box. The first radio button selected means that we are going to safelist this entry for all of our internal hosts. The main reason we want to safelist known good connections is so next time we are performing a threat hunt we don't have to reanalyze the same information; it will just not show up on our analysis tool next time around, making us more efficient as practitioners. Next, the 'enable wildcard' function allows us to safelist more broadly when subdomains are present. For example, we see that we are going to safelist config.edge.skype.com but let's say we wanted to safelist everything under edge.skype.com, which would include config.edge.skype.com and all other subdomains tied to edge.skype.com. We're certainly at liberty to do this if we deem it appropriate, but more broadly safelisting may not be in your best interest, especially when we go as broadly as possible in this example by wildcarding everything under skype.com. This could potentially leave us open to more possibilities for an attacker to gain entry into our environment. The slider at the bottom of the image above allows us choose how much of a domain we want to wildcard.
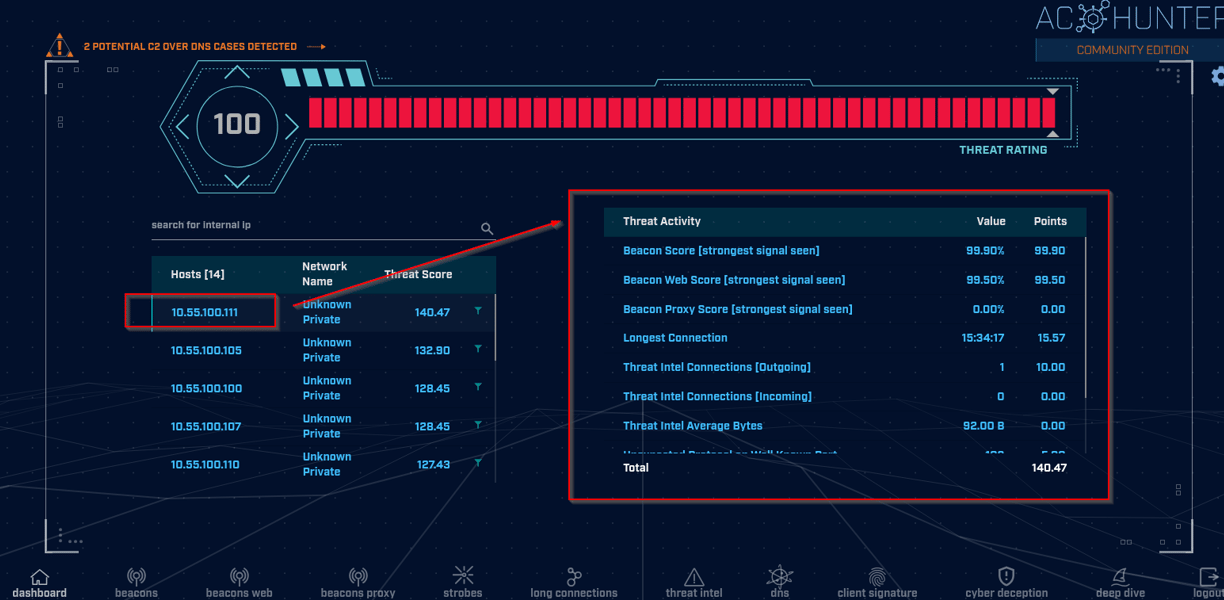
When we return to our dashboard we're greeted with the same information we saw upon logging into AC Hunter. We see our hosts on the left and the corresponding threat activity information on the right. When we click on the host that I have indicated above (10.55.100.111) all the information on the right is updated to reflect the activity that is occurring on that host. The "beacon score" on the right is high, so let's click on the beacon score and get some more information...
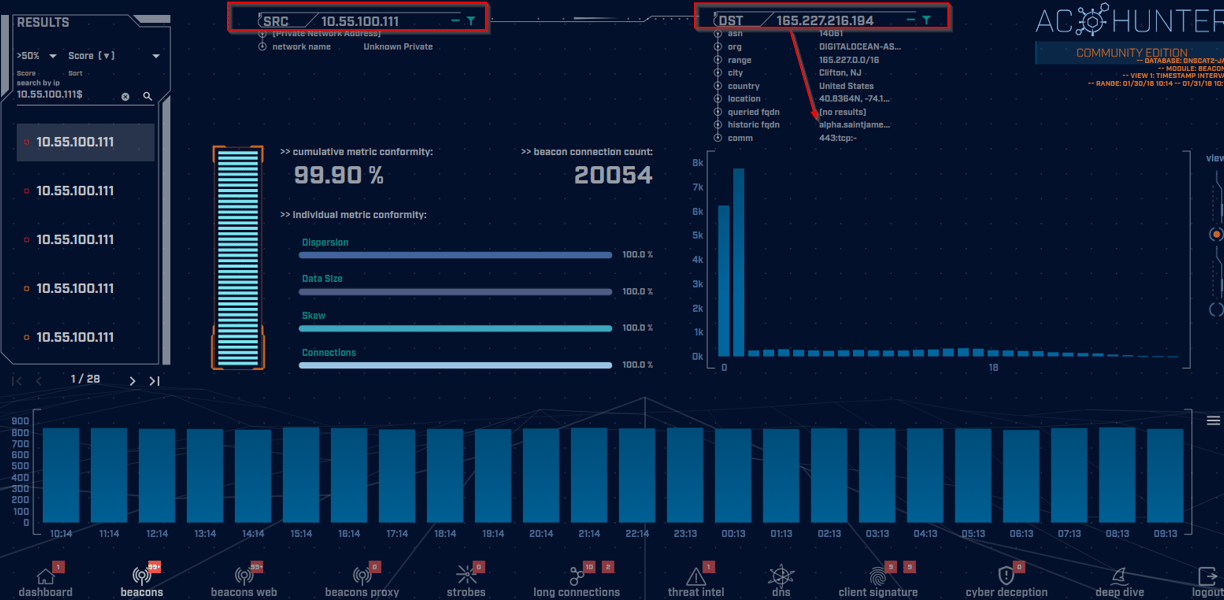

On this screen we see our highlighted internal host at the top left of the image and the destination IP address on the top right. The corresponding domain name is indicated with an arrow pointing from its IP address. If we look just below that we see that SSL is not indicated after "443:tcp" which could merit further attention since SSL should be indicated on the HTTPS port, which is standardized as tcp port 443. We can dig in a bit deeper here by clicking on the FQDN and looking it up in VirusTotal, AlienVault, or another one of the listed tools in the dropdown menu and see whether we find anything concerning like we did in our previous example when we looked up config.edge.skype.com. Let's pivot to the final leg of our AC Hunter tour by looking at another aspect of the tool known as "Deep Dive."
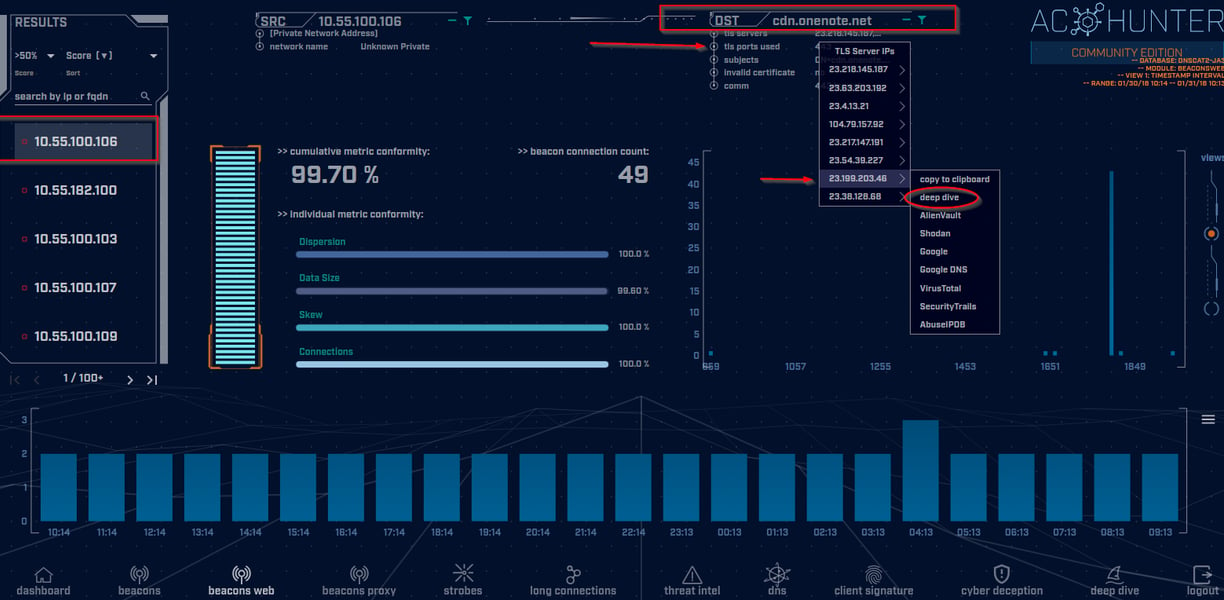
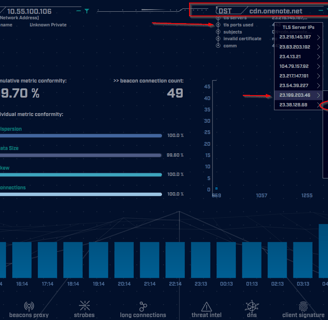
Along the bottom of the screen you'll see a bunch of icons you can click on. Let's go back to "beacons web." From there, we'll click on one of our host IPs on the left (10.55.100.106) and see that it is reaching out to a web server for the Microsoft OneNote application. Let's click on one of the TLS server IPs and choose "deep dive."
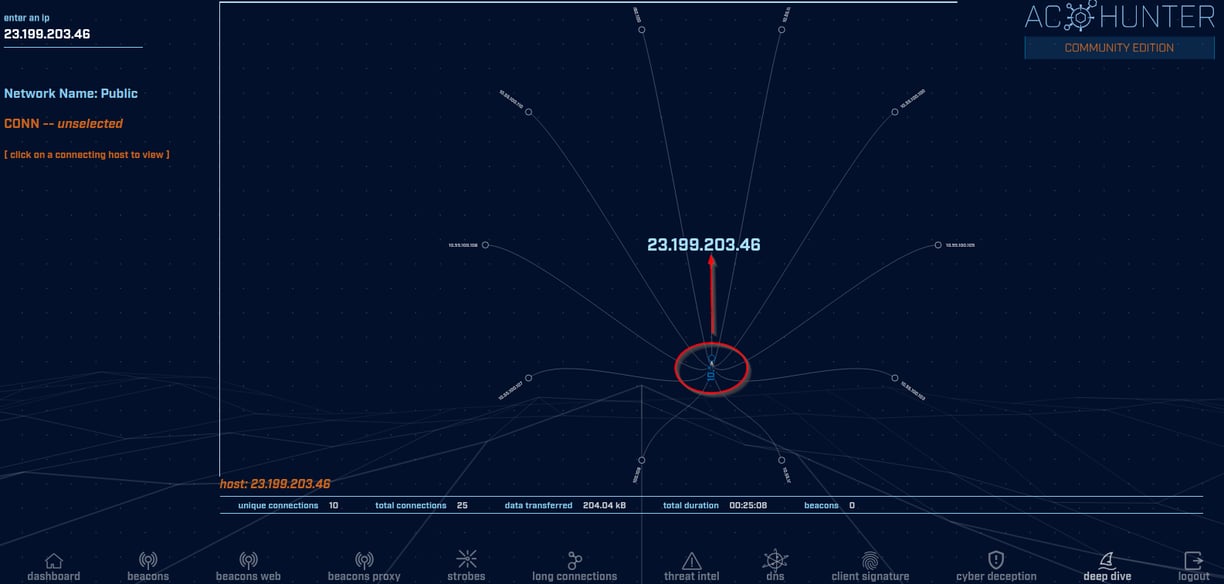

Circled in red we have the "10.*" node. Click it and it expands to show all the internal hosts that are communicating with this web server (23.199.203.46) hosting OneNote. If this wasn't a OneNote server, however, and we were pretty sure this was a C2 server spun up by an attacker, this functionality gives us the ability to see all of the internal systems that are communicating with that command-and-control server, and those internal hosts would all become part of our further investigation. Let's assume that this OneNote server is actually a C2 server. If we want to start investigating the activity on one of the compromised internal hosts we can click on it and see everything that host has been up to.
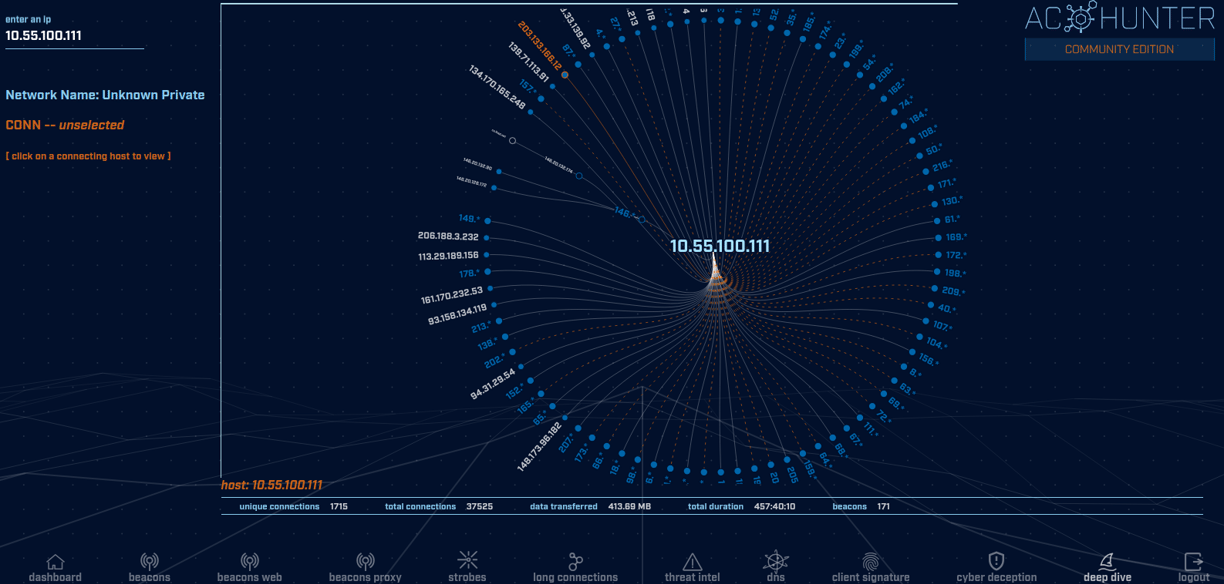
For this example I chose the host at 10.55.100.111. We can see all of the different connections that this host is communicating with. Depending on our processes and strategies, we may investigate every IP address listed here or maybe we would filter out some of these connections based on our safelists and other filters we may create. This has been a very brief overview of some of the functionality and capabilities of the threat hunting tool, AC Hunter. If this has sparked your interest, consider going through the course here on YouTube. You can't beat high quality training that's also free! You'll need to download an Ubuntu virtual machine and use either VMware or VirtualBox. Personally, I use VMware Workstation 17 Pro, and I enjoy its ease of use. I hope you got some value out of this post and became a little more knowledgeable about threat hunting and are now inspired to learn more. It's a great time to get into threat hunting, since it is a relatively new discipline (really taking off in just the last several years). You could develop a valubale niche within the discipline over time and make your skillset that much more attractive in the job marketplace, consulting, or doing whatever is most rewarding to you! Take care, and see you next time.